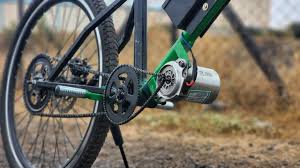
How To Make An Electric Bike With A Starter Motor, Electric bikes (e-bikes) are becoming increasingly popular for their eco-friendliness and efficiency. Building your own electric bike using a starter motor can be a rewarding DIY project that saves you money and allows you to customize your ride. Here’s a step-by-step guide on how to make an electric bike with a starter motor.
Materials Needed
- Starter Motor: A 12V starter motor from a car or motorcycle.
- Bicycle Frame: A sturdy frame to support the motor and battery.
- Battery: A 12V rechargeable battery, preferably a lead-acid or lithium-ion battery.
- Throttle Controller: To control the speed of the bike.
- Wires and Connectors: For connecting the motor and battery.
- Mounting Brackets: To secure the motor to the bicycle frame.
- Tools: Wrenches, screwdrivers, wire strippers, and a soldering iron.
Step-by-Step Instructions
1. Choose the Right Bicycle Frame
Select a bike frame that can support the added weight of the motor and battery. Mountain bikes are usually a good choice due to their sturdy construction.
2. Prepare the Starter Motor
- Remove any unnecessary components from the starter motor to reduce weight.
- Ensure the motor is in good condition, and test it to confirm it works properly.
3. Install the Motor
- Use mounting brackets to securely attach the starter motor to the frame. The motor should be positioned in a way that allows the bike’s chain to connect to the motor’s shaft.
- You may need to modify the bike frame slightly to accommodate the motor.
4. Connect the Battery
- Secure the battery onto the bike frame using straps or brackets.
- Connect the positive and negative terminals of the battery to the starter motor. Use appropriate wiring to ensure a solid connection, and be careful to maintain correct polarity to avoid damage.
5. Install the Throttle Controller
- The throttle controller allows you to manage the speed of your e-bike.
- Connect the throttle controller to the motor and battery according to the manufacturer’s instructions. Ensure that the throttle is easily accessible while riding.
6. Connect the Wiring
- Use appropriate gauge wires to connect the motor to the battery and throttle controller. Make sure to use connectors that can handle the power output.
- Solder connections if necessary for better conductivity and durability.
7. Test the Setup
- Once everything is connected, test the setup without riding the bike. Turn on the battery and gradually use the throttle to check if the motor runs smoothly.
- Make any adjustments as needed, ensuring everything is secure and functioning properly.
8. Safety Measures
- Always wear a helmet and protective gear while testing your e-bike.
- Ensure all components are securely mounted and that there are no loose wires that could cause a short circuit.
Conclusion
Creating your own electric bike with a starter motor can be an exciting project that not only saves you money but also provides a unique riding experience. With some basic tools and materials, you can customize your e-bike to fit your specific needs and preferences. Remember to prioritize safety and enjoy the process of building your electric bike!
You Might Also Like These:

