Diy Electric Bike Conversion, Are you looking to enhance your cycling experience without splurging on a brand-new electric bike? A DIY electric bike conversion might just be the perfect solution. This guide will take you through the essentials of converting a standard bicycle into an electric one, making your rides faster, more convenient, and eco-friendly.
Why Convert to Electric?
Converting your bicycle to electric not only saves you money but also provides several benefits:
- Cost-Effective: Purchasing a new electric bike can be expensive, whereas converting your existing bike can be significantly cheaper.
- Eco-Friendly: Electric bikes produce lower emissions compared to cars, making them a greener choice for transportation.
- Exercise: You still get the benefits of cycling, as most electric bike conversions allow you to pedal manually as well.
- Customization: You can choose the components that best suit your needs and preferences.
Tools and Materials Needed
Before starting your DIY electric bike conversion, gather the following tools and materials:
Tools:
- Screwdriver set
- Allen wrenches
- Torque wrench
- Wire cutters
- Soldering iron (if needed)
Materials:
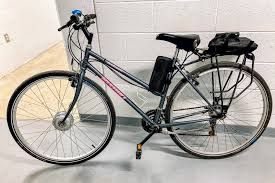
- Electric Bike Conversion Kit: These kits typically include a motor, battery, controller, and necessary wiring. Popular options include front hub motors, rear hub motors, and mid-drive motors.
- Battery: A quality lithium-ion battery is essential for optimal performance. Ensure it’s compatible with your motor.
- Throttle and Display: Some kits come with a throttle to control your speed, while a display helps you monitor battery life and speed.
- Wiring and Connectors: These will be used to connect the motor and battery to your bike’s frame.
Step-by-Step Conversion Process
1. Choose Your Kit
Start by selecting the right conversion kit for your bicycle. Consider factors like the type of motor (hub or mid-drive), power rating (usually between 250W to 1000W), and battery capacity. Ensure the kit is compatible with your bike type (mountain, road, or hybrid).
2. Prepare Your Bike
Before installing the components, inspect your bike. Ensure the frame, brakes, and gears are in good condition. Clean the bike thoroughly, as it will make the installation process easier.
3. Install the Motor
Hub Motor:
- Front Hub Motor: Remove the front wheel and replace it with the motor wheel provided in your kit. Reinstall the wheel and make sure it’s aligned properly.
- Rear Hub Motor: This process is similar, but you’ll need to remove the rear wheel and install the motor in its place.
Mid-Drive Motor:
- Remove the bike’s pedals and crankset. Follow the manufacturer’s instructions to mount the mid-drive motor in the designated space, usually near the bottom bracket.
4. Attach the Battery
Mount the battery securely on the frame. Many kits offer a rack or a frame bag to hold the battery. Ensure it is easily accessible for charging but also secure enough to withstand vibrations.
5. Connect the Wiring
Follow the wiring diagrams provided with your kit. Connect the motor to the controller, and then connect the controller to the battery. Be careful to secure the wires to avoid snagging while riding.
6. Install Throttle and Display
If your kit includes a throttle, install it on the handlebars for easy access. Similarly, mount the display where it’s visible while riding, typically on the handlebars or the stem.
7. Test Your Setup
Before heading out for a ride, conduct a thorough check:
- Ensure all components are securely fastened.
- Test the brakes and gears.
- Charge the battery fully before your first ride.
Safety Considerations
- Wear a Helmet: Always wear a helmet when riding, especially at higher speeds.
- Check Local Laws: Be aware of local regulations regarding electric bikes, as there may be restrictions on motor power and usage in certain areas.
- Maintenance: Regularly check the battery, wiring, and motor for any wear and tear.
Conclusion
Converting your bike to electric can be a rewarding project that enhances your cycling experience. With the right tools, materials, and a bit of patience, you can enjoy the benefits of an electric bike without breaking the bank. Not only will you get a faster, more efficient ride, but you’ll also have the satisfaction of having built it yourself. Happy cycling!
You Might Also Like These:
best electric bike for hill climbing
golden technologies electric wheelchair